Interval Custom Integration - Uptime Monitor
This page explains how to create a custom integration for a website uptime monitor. The integration will check the status of a website at set intervals and post the result to the Telex channel where is it activated.
1. Creating the Project
First things first, let's set up our Python environment and install the necessary dependencies.
Step 1: Initialize the Project
Start by creating a new directory for your project and setting up a virtual environment:
mkdir uptime-monitor
cd uptime-monitor
python3 -m venv .venv
source .venv/bin/activate  # Windows: .venv\Scripts\activate
Step 2: Install Dependencies
We'll use FastAPI for our application:
pip install "fastapi[standard]"
Step 3: Create the main python file
Create a file named main.py where we'll write our integration logic:
touch main.py
Now we’re ready to write some code.
2. Adding the /integration.json Endpoint
Telex integrations are implemented as web services and must expose a route that returns their JSON schema. This schema defines all the important data Telex needs to interact with the integration. Refer to the Creating Integrations guide for more information.
Open main.md and start with this code:
from fastapi import FastAPI, Request
from fastapi.responses import FileResponse

app = FastAPI()

@app.get("/integration.json")
def get_integration_json(request: Request):
    base_url = str(request.base_url).rstrip("/")
    return {
        "data": {
            "descriptions": {
                "app_name": "Uptime Monitor",
                "app_description": "Monitors website uptime",
                "app_url": base_url,
                "app_logo": "https://i.imgur.com/lZqvffp.png",
                "background_color": "#fff"
            },
            "integration_type": "interval",
            "settings": [
                {"label": "site-1", "type": "text", "required": True, "default": ""},
                {"label": "site-2", "type": "text", "required": True, "default": ""},
                {"label": "interval", "type": "text", "required": True, "default": "* * * * *"}
            ],
            "tick_url": f"{base_url}/tick"
        }
    }
The integration type is defined as interval, and we've added three settings:
site-1andsite-2are text fields for the URLs of the websites to monitor. You can add more sites as needed. More sites will mean more checks for this integration so add them wisely if you do not have a lot of resources.intervalis a text field for the cron expression defining the interval.
Run the Server
Start your server to test the endpoint:
uvicorn main:app --reload
Navigate to http://localhost:8000/integration.json and verify the JSON response.
3. Adding the functions for monitoring
We'll define the MonitorPayload class and implement the endpoint:
from pydantic import BaseModel
from typing import List
from fastapi import BackgroundTasks
import httpx
import asyncio

class Setting(BaseModel):
    label: str
    type: str
    required: bool
    default: str

class MonitorPayload(BaseModel):
    channel_id: str
    return_url: str
    settings: List[Setting]

async def check_site_status(site: str) -> str:
    try:
        async with httpx.AsyncClient() as client:
            response = await client.get(site, timeout=10)
            if response.status_code < 400:
                return None
            return f"{site} is down (status {response.status_code})"
    except Exception as e:
        return f"{site} check failed: {str(e)}"

async def monitor_task(payload: MonitorPayload):
    sites = [s.default for s in payload.settings if s.label.startswith("site")]
    results = await asyncio.gather(*(check_site_status(site) for site in sites))

    message = "\n".join([result for result in results if result is not None])

    # data follows telex webhook format. Your integration must call the return_url using this format
    data = {
        "message": message,
        "username": "Uptime Monitor",
        "event_name": "Uptime Check",
        "status": "error"
    }

    async with httpx.AsyncClient() as client:
        await client.post(payload.return_url, json=data)
4. Adding the /tick Endpoint
Telex maintains the clock time for interval integrations. When the defined interval is reached, Telex will call the /tick endpoint to initiate uptime checks. This endpoint should expect a POST request with the payload containing the channel ID, return URL, and settings. Telex will send these details to the endpoint when it's time to check the uptime. The handler for this endpoint should generally do its processing in the background so that it can handle new requests quickly. This also gives it time to complete its processing before sending the response back to Telex via the return URL.
from fastapi import BackgroundTasks

@app.post("/tick", status_code=202)
def monitor(payload: MonitorPayload, background_tasks: BackgroundTasks):
    background_tasks.add_task(monitor_task, payload)
    return {"status": "accepted"}
Testing the Integration
Use curl or Postman to send a test request to /tick. Ensure you replace <your-test-telex-channel-id> with a test actual Telex channel ID. Note that this demonstration is for testing purposes. Telex will send the actual channel ID and return URL when the integration is activated on a channel and the interval is reached.
curl --location 'http://localhost:8000/tick' \
--header 'Content-Type: application/json' \
--data '{
    "channel_id": "<your-test-telex-channel-id>",
    "return_url": "https://ping.telex.im/v1/return/<your-test-telex-channel-id>",
    "settings": [
        {
            "label": "site-1",
            "type": "text",
            "required": true,
            "default": "https://google.com"
        },
        {
            "label": "site-2",
            "default": "https://www.somefakewebsitethatisfake.com",
            "type": "text",
            "required": true
        },
        {
            "label": "interval",
            "type": "text",
            "required": true,
            "default": "* * * * *"
        }
    ]
}'
If everything is done correctly, you should see a new uptime check on the Telex channel you specified.

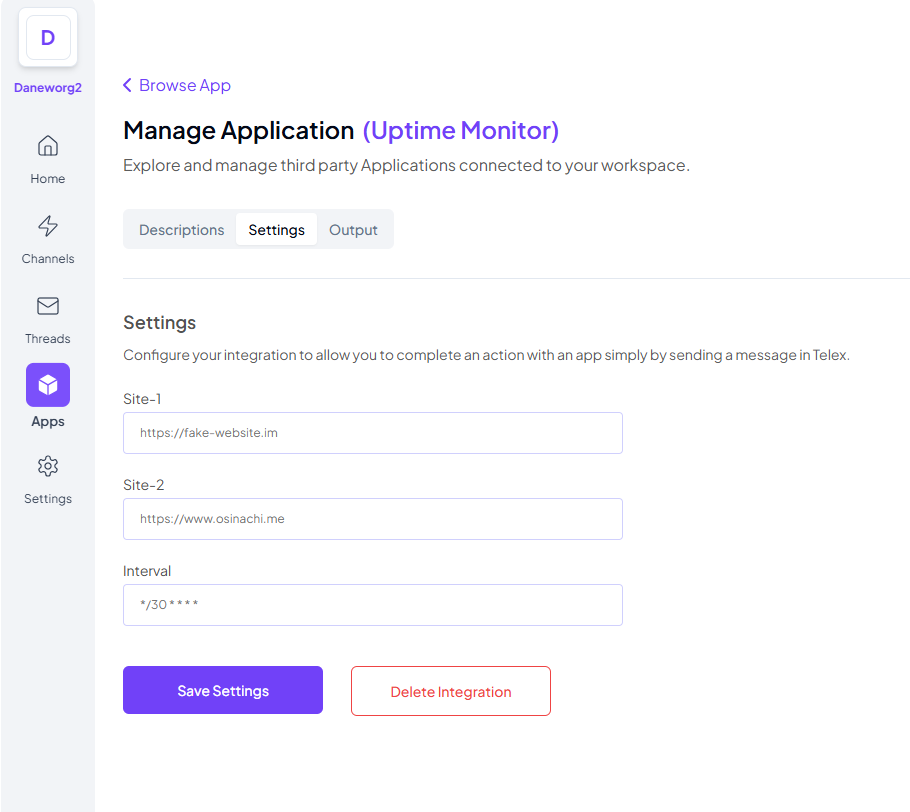
4. Hosting and further tests
Host the application on a server so you can add it to your Telex organization. You can use hosting service with a generous free offering like Render or fly.io. Once hosted, add the integration to your organization's Apps page with the <your-hosted-url>/integration.json URL. Afterwards, proceed to activate it, and configure it. Add the sites you wish to monitor and set the interval.